Navigate a Matter in ZyLAB ONE
When you selected a matter in the Select Matter Dashboard, the following screen appears.
Matter Dashboard

- This is the menubar.
- If you select Continue Review you will continue where you were last time.
- If you select Browse, you will enter the Document dashboard.
- If you select Upload, you can upload data.
- If you select Overview, you can view all available information about your current matter.
- If you select Batch Search, you will be able to execute multiple queries at once.
- If you select Sampling Overview, you can view all sampling sets that have been created. For more information on Sampling, see Sampling.
- If you select Production Overview, you can view all productions of the currently open matter.
- If you select Audit Log, you see the complete audit log of the matter.
- If you select Review Batches, you get an overview of your current review batches.
- If you select Reports, you can view all available reports.
- If you select Configuration, you will enter the Configuration dashboard.
- If you select Assisted Review, you can identify relevant documents in a large data set.
Document Dashboard
The document dashboard gives an overview of all the data present in the matter.

- This is the menubar.
- This is the breadcrumb trail.
- This is the search bar. You can search all documents by using keywords and queries.
- Here you’ll see which matter you’re currently in. Select to open a different matter.
- Here you can switch between document list view and facet view.
- Here you’ll see under which account you’ve logged in. You can log out by selecting Logout.
- These are the facets. Facets visualize the documents by dividing them based on different characteristics. For example differences in the meta data of a document, like the data it was made, the person who the document belongs to, etc. By selecting a slice of a facet, you can easily specify your search.
- Here you can personalize your facet view.
Menubar
In the Menubar you'll find all options that are also available in the Matter Dashboard.

Document List
When you switch from facet view to document list, you will see the following screen:

- Here you’ll see your documents and the corresponding meta data. Which meta data is displayed can be changed according to your preferences.
-
Here you can find different ways to sort your documents.
- Here you can change settings and employ different functionalities. More information about this topic is explained below in Document List Options.
- Here you can select how many documents are displayed per page. You are also able to see how many pages there are in total and which page you are on currently.
Menubar
In the Menubar you'll find all options that are also available in the Matter Dashboard.
Document List
When you switch from facet view to document list, you will see the following screen:
Document List Options

- Columns: Here you can change which columns are displayed in your document list. You can change these according to what type of meta data you’re searching for.
- List Options: Here you can select whether or not you want to see connections between related documents.
- Views: Here you can switch between saved views. By selecting certain columns and then saving the view, you can quickly switch between different views depending on what type of information is most interesting during your search.
- Duplicates: Here you switch between Show/Hide Duplicates Count and Show/Hide Family/Document Duplicates.
- Bulk Tagging: Here you can tag multiple documents at once. Select the documents you want to tag, and then select Bulk tagging to add the tag to all selected documents.
- Review Batches: Here you can divide documents into different batches. This is useful when there are multiple investigators.
- Batch Downloads: Here you can download selected documents. This isn’t commonly used in an internal investigation and therefore won’t be covered in this use case.
- Productions: Here you can produce the relevant documents once you’ve finished your investigation and include them in the final report.
- Sampling: Use Sampling to evaluate the results of the review process. For example, evaluate the tagging results of individual users.
- Reports: Export current Document List to a CSV or Excel file that can be used to generate reports.
- Open Connected View: Keep an eye on the Document List, while simultaneously reviewing a document in Document View in a second window (on another monitor) or in a new tab.
- Show Documents Quickly access frequently used actions in the Document List. The existing navigation is preserved, with common actions now available more directly from the toolbar.
- Delete Selection/Documents/Families: Here you can delete documents from your matter.
Matter Overview
In the Matter Overview you will see information about your progress.
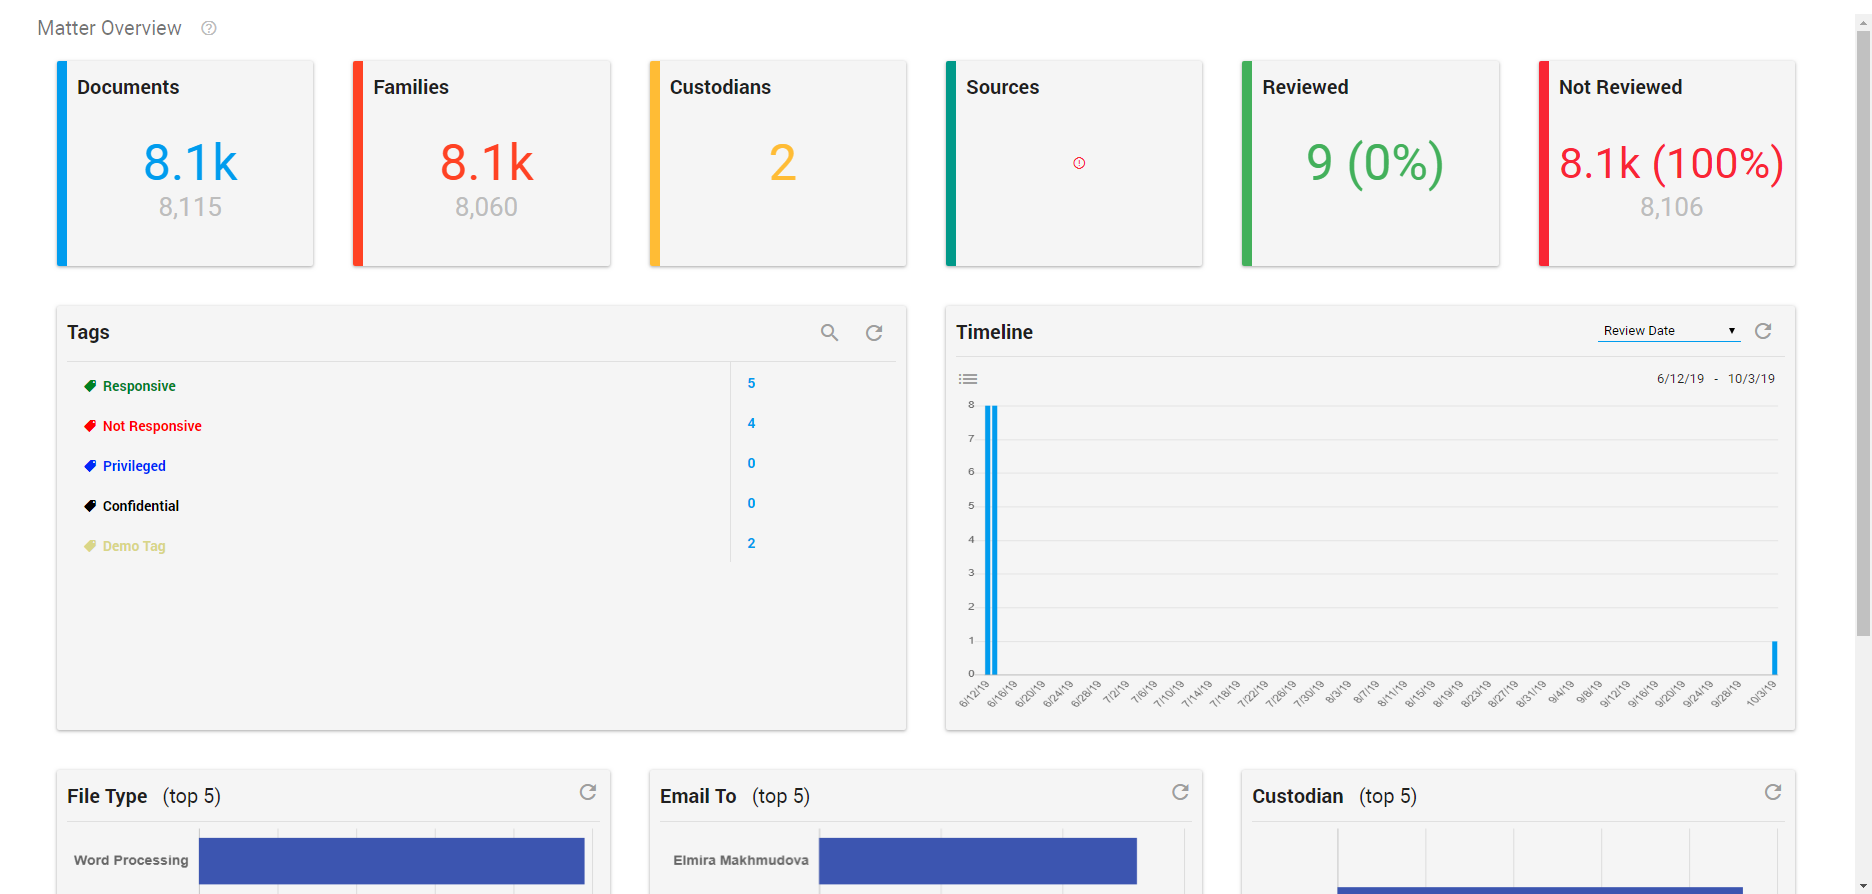
Documents Tile
Click to view all matter documents in Document List as Flat List.
Families Tile
Click to view all matter documents in Document List as Family Tree.
Custodians and Sources Tile
View the number of related custodians and sources.
Reviewed and Not Reviewed Tile
Click to view documents with either the review status Reviewed or Not Reviewed.
Tags
The tags are sorted according to the order used in Document View.
Click Show More to view all available tags.


Timeline


Or, click the Document List icon to view all documents displayed in the timeline.
Tip: For a time range search, it is advised to use Date Search.
Facet Values
The first 3 facets from Facet View are displayed here, with the top 5 values per facet.
Click on a bar to open these documents in the Document List.